

Class services are created in Offerings → Services, not in Appointments. Set the
service type to Class there, along with its price, duration and payment mode. You then
schedule the individual sessions from the Appointments calendar.
How classes differ from 1:1 appointments
Seats, not slots
A 1:1 appointment takes a staff member’s slot. A class has a Capacity: several
clients book the same session until it fills.
No rescheduling
Clients can cancel a class from their booking link, but they can never reschedule one to
a different time. There is no other slot to move to.
A waitlist
When a class is full, clients can join a waitlist and are promoted automatically when
someone cancels. 1:1 appointments have no waitlist.
Different automation triggers
Booking a seat fires Class booked, not Appointment booked. See
Automation triggers.
Schedule a session
1
Create the class service
In Offerings → Services, create a service and set its type to Class. Set the
price and payment mode here; they apply to every session of that class.
2
Open the calendar
Go to Appointments → Calendar. This is where you View and manage all bookings,
classes and blocked time in one place.
3
Add the session
Select New class, pick the class service, and set the date and time. If you see
No class services available. Create a class service first., the service type is still
set to appointment.
4
Set capacity and waitlist
Set Capacity to the number of seats, and turn on Enable waitlist if you want
clients to queue for a place once it fills. Both open pre-filled from a class service’s own
Capacity and Enable waitlist in Offerings → Services, and they don’t re-fill
when you pick a different service in the form, so check them before you save.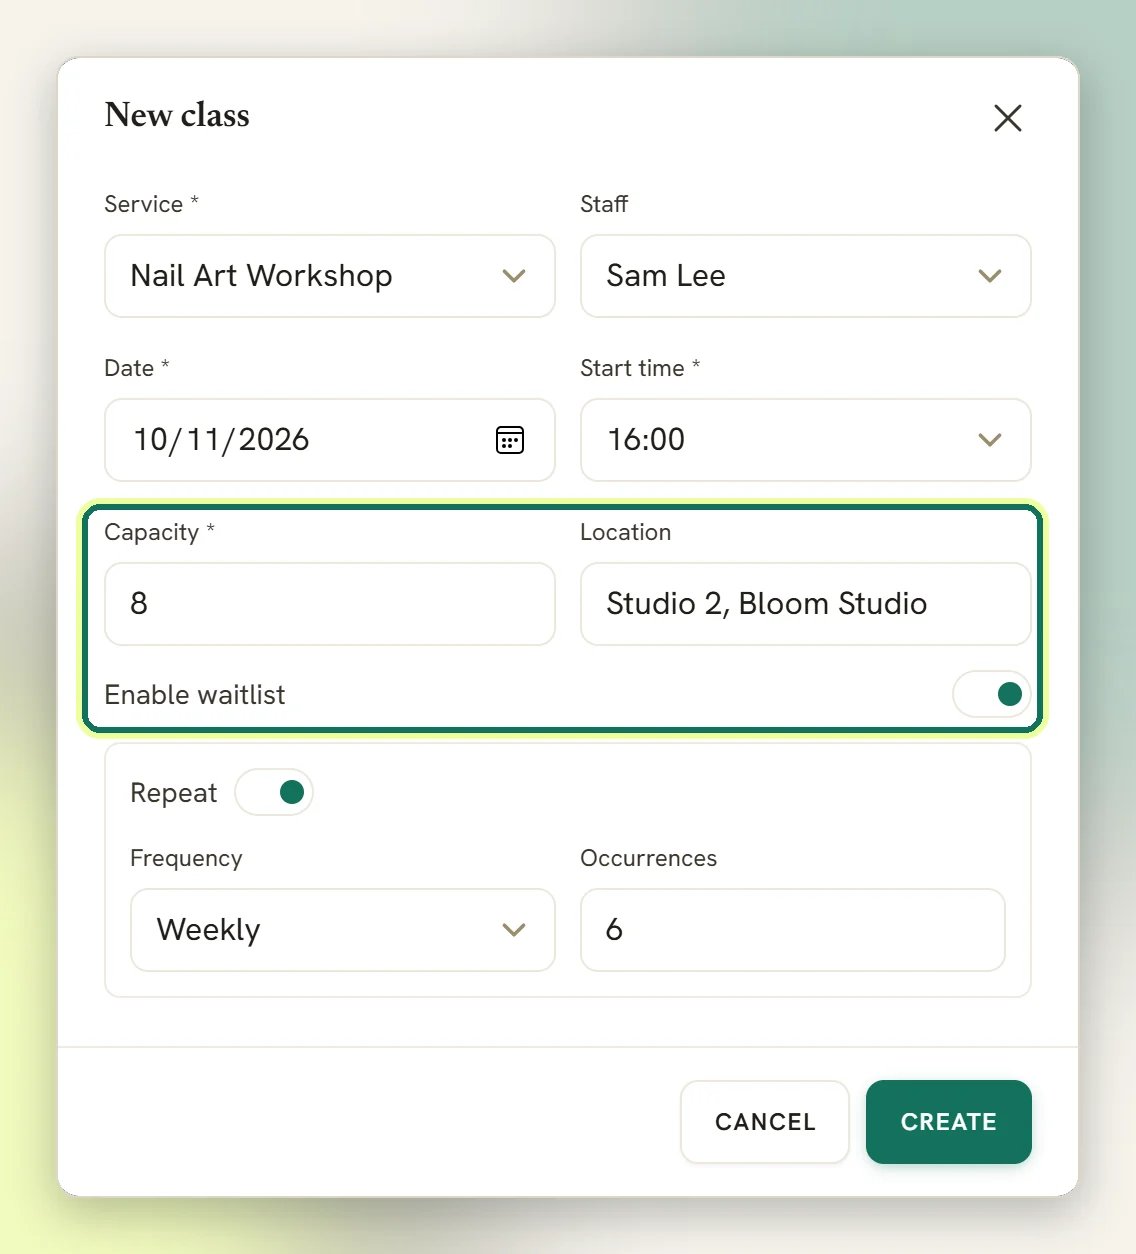
Repeat a class
A class does not have to be scheduled one date at a time. Tick Repeat in the create form and pick a frequency, daily, weekly, every two weeks or monthly, plus how many occurrences to create. DMLY generates them all at once, up to 52, and they share one series so you can act on them together afterwards. Two things follow from that:- Enrolling a batch can cover the whole course. Once a session belongs to a series, the enrol modal offers Apply to the entire series, which seats the batch in every later occurrence rather than just the one you picked.
- Cancelling offers the same choice. You can cancel a single session, or that session and every later one in the series.
A monthly series clamps rather than overflows, so a class on the 31st lands on the last day of
a shorter month instead of skipping into the next one. Times hold their wall clock across a
daylight-saving change: a 6pm class stays at 6pm.
Capacity
Capacity is the seat count for one session, not for the class in general; each session carries its own. A client who tries to book a full session sees Sorry, that class is now full. A client who is already booked sees You’re already booked for this class.: the same contact can only hold one seat in a session. Cancelling a session (rather than a single seat) stops it taking any further bookings.Workspace defaults for classes
Classes have their own tab of settings, at Business → Appointments → Settings → Class. Its first panel, Class Settings (Configure how clients book and manage their classes.), holds three switches that change what clients see:- Display remaining slots: Show how many places are left on each class session. On by default. Each session on your booking page shows how many seats are left (“Places left: 3 of 10”); turn it off and the row just reads Available. A full session is unaffected either way: it still reads Full — join waitlist, or Full with the waitlist off.
- Hide staff name for classes: Staff names won’t be shown on class bookings. Off by default. With it off, a session row reads “Monday, March 4 · 6:00 PM · with Amara”; turn it on and the “with …” part is dropped. This is a different switch from Hide staff selection, which only affects 1:1 appointment services.
- Enable waitlist for classes: Default new class sessions to allow a waitlist when full. Off by default.
Enable waitlist for classes is not where the New class form on the calendar gets its
starting position: that comes from a class service’s own Enable waitlist switch in
Offerings → Services, as above. Set the default you want there, and change it per session
as you create each one.
How close to the start a client can still book
The Class Policy panel on the same tab carries Booking window ahead (hours): Clients can’t sign up for a class starting within this window. 0 = no limit. You enter it in hours, it applies across the whole workspace rather than per class or per service, and it starts at 0, so out of the box a client can join a class right up to its start time. It only holds back a client booking themselves on your booking page. A flow’s Add to Class step and a batch enrolment book on your behalf, so neither is held back by it. The AI agent is the exception among the bot paths: it books on the client’s behalf, so it applies the same window itself and offers a later session instead of seating someone inside it.The waitlist
With Enable waitlist on, a client booking a full session is added to the queue instead and sees:This session is full, so you’ve been added to the waitlist. We’ll let you know if a place opens up.Joining the waitlist fires the Joined class waitlist trigger. A waitlisted client holds a position in the queue but has no booking yet, so they get no reminders and nothing appears on your calendar for them.
When a seat opens up
When a booked client cancels, DMLY promotes the client at the front of the queue (first in, first promoted) and messages them automatically. A free class gets the class confirmation message; a pay-before class gets a checkout link instead (see Paid classes). DMLY also fires the Class seat opened trigger for the promoted client at the same time.In the trigger picker this trigger is called Class seat opened. Its internal code is
class_slot_opened and its webhook topic is class.seat_opened; all three names refer to
the same trigger.Paid classes
A class uses the same payment modes as any other service; set them on the service in Offerings → Services. Two behaviours are worth knowing before you charge for a class. Pay before booking needs a connected gateway. With no gateway connected, DMLY refuses the booking up front with Online payment isn’t available right now. Please contact us to book this class. No seat is held. Connect a gateway first; see Payments. Promotion off a paid waitlist is not a free seat. When a place opens on a pay-before class, the promoted client is moved into a payment hold, not a confirmed seat. They are sent a checkout link and still have to pay within the hold window; if they don’t, the seat is released and the next person in the queue is promoted.What clients can do afterwards
From their booking link a client can cancel a class seat, subject to the cancellation deadline you set for classes. They cannot reschedule it; that option does not appear for a class booking at all. If someone needs a different session, they cancel and book the other one, or you move them from Appointments → Calendar.Enrol clients in bulk with batches
A batch is a named, reusable group of clients you can enrol into a class session in one action. Use it for a cohort that repeats often, a sign-up list you built outside DMLY, or any group of clients you want in the same class without booking them one by one.1
Open Batches
Go to Appointments → Batches.
2
Create the batch
Select New batch and give it a name. Starts on, Ends on and Notes are for
your own reference only; DMLY doesn’t act on them.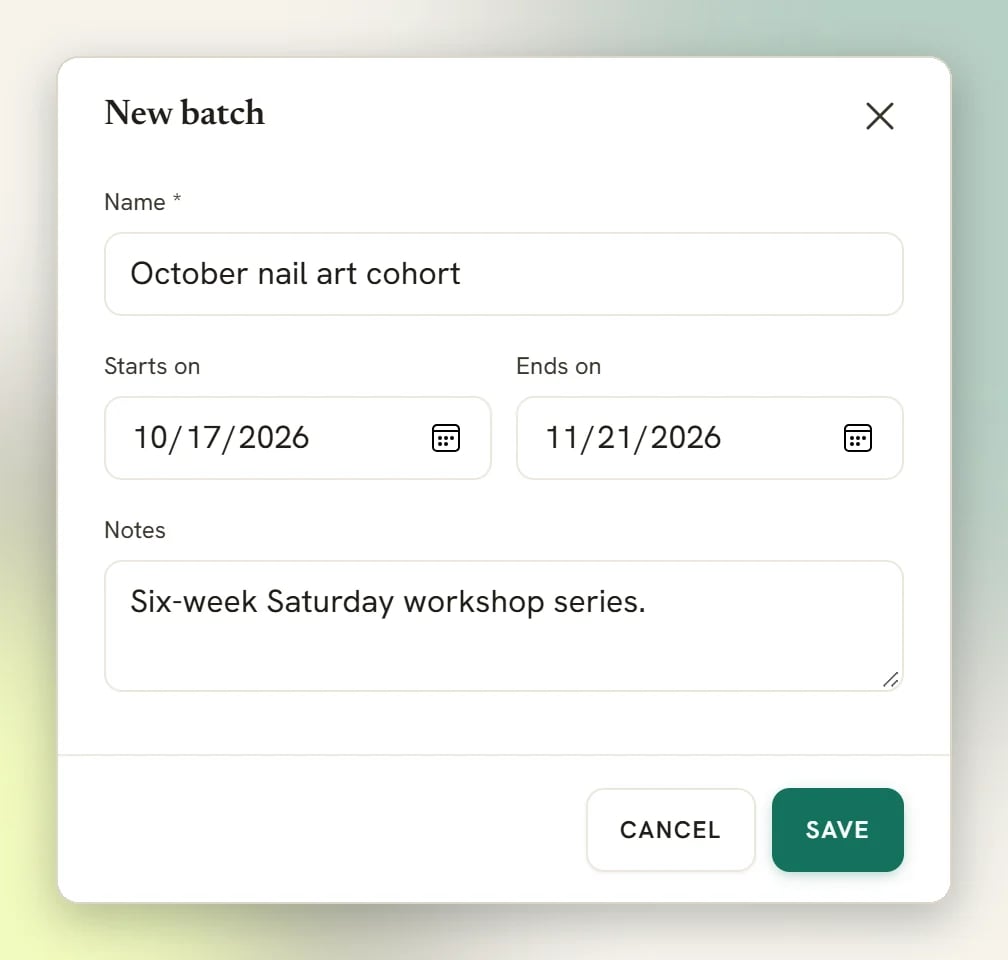
3
Add members
Select Members on the batch, then Search and select a client to add them. Repeat
for everyone in the group.
4
Enrol them into a session
Select Enrol, pick a Class session, and use Notify client to decide whether the
usual class confirmation goes out.
Deleting a batch removes the batch itself, not the bookings it already created; members
already enrolled keep their seats.
Let a bot book the seat
A flow can put someone in a class without you touching the calendar. The Add to Class step, in the builder’s Appointments group, takes a class service and books the contact into its next upcoming session. Capacity and the waitlist work exactly as they do for a client booking themselves: a full session with its waitlist on puts them in the queue instead. The step has a WAITLISTED output as well as its main one, so the flow can say “you’re on the list” rather than “you’re booked”, and a Hold the seat for payment switch for a class you charge for up front. It books on your behalf, so Booking window ahead (hours) doesn’t hold it back: a flow can seat someone in a session starting sooner than a client could book it themselves. Reach for it in a “join tonight’s class” keyword flow, or after a contact taps a button.Roster and attendance check-in
Open a session on Appointments → Calendar and its details panel shows a Roster: every live participant, seats first and the waitlist below them with their queue position. A participant’s phone number shows masked unless you hold the See full phone numbers permission, the same control the rest of the CRM uses. Next to each seat are two buttons: a checkmark for Attended and a cross for No-show. Selecting one applies immediately; selecting the same one again reverts the seat back to Booked. Mark all attended, at the top of the roster, applies Attended to every seat still at Booked (unpaid holds are skipped), after a confirmation showing how many seats it will change. Seats you’ve already marked No-show are left as they are, and the confirmation says so. Marking someone Attended completes their underlying booking (the same Completed status a 1:1 appointment gets), and No-show sets it to no-show, so if your loyalty programme awards class points on attendance rather than on booking, checking someone in is what triggers the award. Check-in isn’t open forever without you noticing. About a day after a session has run, DMLY marks the session itself completed and closes off the bookings behind its seats (see past bookings close themselves). The roster still shows each seat exactly as you left it, and you can still mark Attended or No-show afterwards: DMLY reopens the underlying booking to apply it, so a late check-in still awards the loyalty points. Checking people in needs the Edit team appointments permission, or being the staff member the session is hosted by. A session with no assigned host (a workspace-wide class) needs the team permission either way, since there’s no “own” staff member to fall back to. The waitlist itself has no check-in: a waitlisted or cancelled place can’t be marked either way, since there’s no seat yet to attend.Online classes
A class service’s location (set on the service itself in Offerings → Services) decides how clients join online:- Zoom (auto link) creates one Zoom meeting for the session, and every booked client gets that same shared join link. Individual seats never get their own meeting.
- Zoom Webinar (per-attendee) creates a Zoom webinar for the session instead, and DMLY registers each client individually the moment they get a seat: booking directly, promoted off the waitlist, or enrolled through a batch. Each of them gets their own personal join link, not the shared one, so you can tell attendees apart in Zoom’s registrant list. This needs the paid Zoom Webinars add-on on your connected Zoom account; without it, Zoom refuses to create the webinar and every seat falls back to no personal link (see below). Registering needs an email address on the contact: a client with no email on file falls back to the session’s shared link instead, and cancelling a seat un-registers that attendee.
A class disappeared from the booking page
A class disappeared from the booking page
Check three things on the service in Offerings → Services: it is active, it is set to be
publicly visible, and its type is Class. Then check the session itself still exists on
Appointments → Calendar, hasn’t been cancelled, is not in the past, and doesn’t start inside the class booking window. A full session
does not disappear; it still shows, as Full — join waitlist or, with the waitlist off,
as a Full row that can’t be selected.
Nobody is being messaged when a place opens up
Nobody is being messaged when a place opens up
DMLY sends the promotion message itself, so the cause is that built-in message failing
rather than a missing flow. Check the client is reachable on WhatsApp, and for a pay-before
class check a gateway is still connected so the checkout link can be minted.If you added your own flow on Class seat opened and only that is missing, check the same
contact: a contact who has opted out, or whose bot is paused, is skipped by the flow.
My appointment flow doesn't run for classes
My appointment flow doesn't run for classes
Booking a class seat fires Class booked, never Appointment booked; rebuild that
flow on Class booked.Cancelling works the same way: a cancelled seat, or a cancelled waitlist place, fires only
Class cancelled, never Appointment cancelled. So building both flows won’t message
anyone twice.Check-in fires no trigger at all. Marking a seat attended awards the class’s loyalty points,
but neither attended nor no-show fires Appointment completed, Appointment no-show or
any class trigger. There is currently no trigger to build a check-in follow-up on.One thing a Class cancelled flow is genuinely for: DMLY sends no cancellation message of its
own for a class seat, unlike a 1:1 appointment, which gets the service’s cancellation message.
If you want a cancelled seat acknowledged, that flow is what does it.
I can't mark someone attended
I can't mark someone attended
If the buttons are simply missing next to a seat, that’s an unpaid pay-before hold. See the
note in Roster and attendance check-in. If the Roster
shows No participants even though the session has bookings, and you see an error message
when you open it, you’re missing the Edit team appointments permission and aren’t the
session’s own staff member; it looks identical to a genuinely empty roster, so check your
permission before assuming nobody’s booked. Ask a workspace admin for access.
The Batches tab is missing
The Batches tab is missing
It’s permission-gated, not hidden by accident. Owners and admins always see it. Any other
teammate needs Manage class batches to see the Batches tab or enrol a batch. That
permission is granted through a
custom role built in Team Roles
(Workspace Settings → Team Members, then select Team Roles).