

Services are set up under Offerings, not under Appointments. This trips up almost everyone.The Appointments hub manages bookings, staff, availability and the booking page. The service itself (its duration, buffers, price, payment mode and reminder times) is edited at Offerings → Services. See Services for what each setting does and Offerings for the wider catalogue.
The pieces
Services
What you sell time for. A service carries the duration, buffers, notice rules, price and payment mode. Edited under Offerings.
Staff and availability
Who can be booked, their working hours in their own timezone, and one-off time off or blocks.
Booking page
Your public page. Clients pick a service, a staff member and a time without logging in.
Classes
Fixed sessions with a capacity and an optional waitlist. Each seat is still a booking.
Payments
Charge nothing, charge after the appointment, or hold the slot until the client pays.
Calendar and Zoom sync
Push bookings to Google Calendar, pull external events back as busy time, and mint Zoom links.
Custom domain
Serve the booking page on your own domain. Plan-gated.
Meetings
The older scheduler. Same bookings underneath.
- Bookings: a searchable, filterable list of every booking, split into Upcoming and Past.
- Calendar: View and manage all bookings, classes and blocked time in one place.
- Batches: Group clients and enrol them into classes in one action.
- Staff: Manage staff members, their hours and the services they offer.
The Bookings list
Bookings has two tabs, Upcoming and Past, and each label carries a live count. Upcoming means a booking that is still going to happen: confirmed, pending, or awaiting payment, and still in the future. A booking waiting on a payment is upcoming, not past. Past is everything else: cancelled, completed, no-show, expired, payment-failed, and anything whose time has simply gone by. Above the table sit a search box and four dropdowns.- Search by client, service or staff matches the client’s name, email or phone, the service name and the staff member’s name.
- All services, All staff, All statuses and All sources narrow the list.
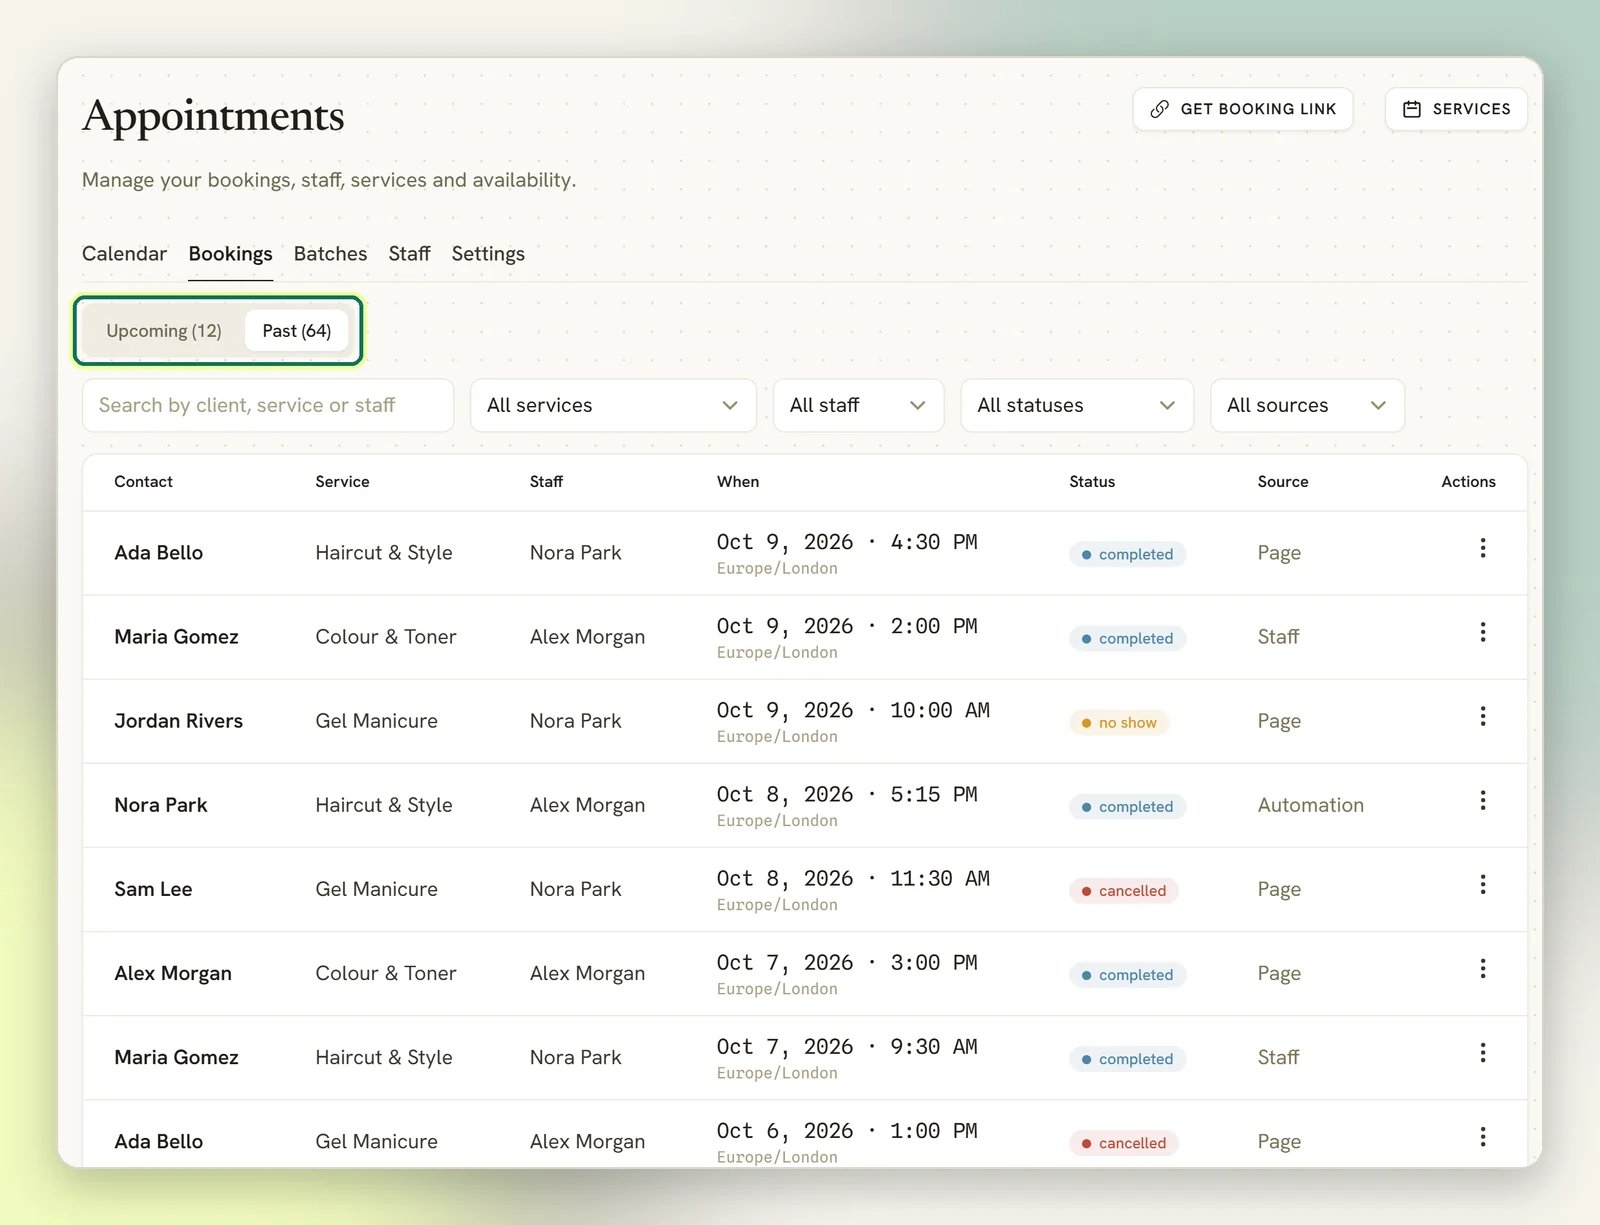
The counts on the tabs honour whatever filters are set, and they are scoped the same way the rows are. A teammate without View team appointments sees only their own bookings, in the counts as well as in the list. See Roles and permissions.
How a booking comes together
A service says how long it takes and how far ahead you will accept it. A staff member says which hours they work and which services they offer. DMLY combines the two and shows only the times that survive every check:- The service’s minimum notice and booking horizon. Your workspace settings can tighten both (minimum notice is a floor, the booking horizon a ceiling) but never loosen them.
- Busy time on the connected calendar.
- The staff member’s existing bookings, plus the service’s buffers either side.
- Any block or time off, whether it belongs to one staff member or to the whole workspace.
Working hours are wall-clock times in the staff member’s own timezone, not yours. If a stylist works 9:00 to 17:00 in Lagos and your workspace is in London, set 9:00 to 17:00 on their record and let DMLY do the conversion.
Add a booking by hand
The client on the phone, the walk-in at the counter: book them yourself from the Calendar view. New appointment asks for:- Contact, Staff and Service.
- Date and Start time, in 15-minute steps.
- A starting status of Confirmed or Pending.
- Notify client, the switch that decides whether the confirmation message goes out.
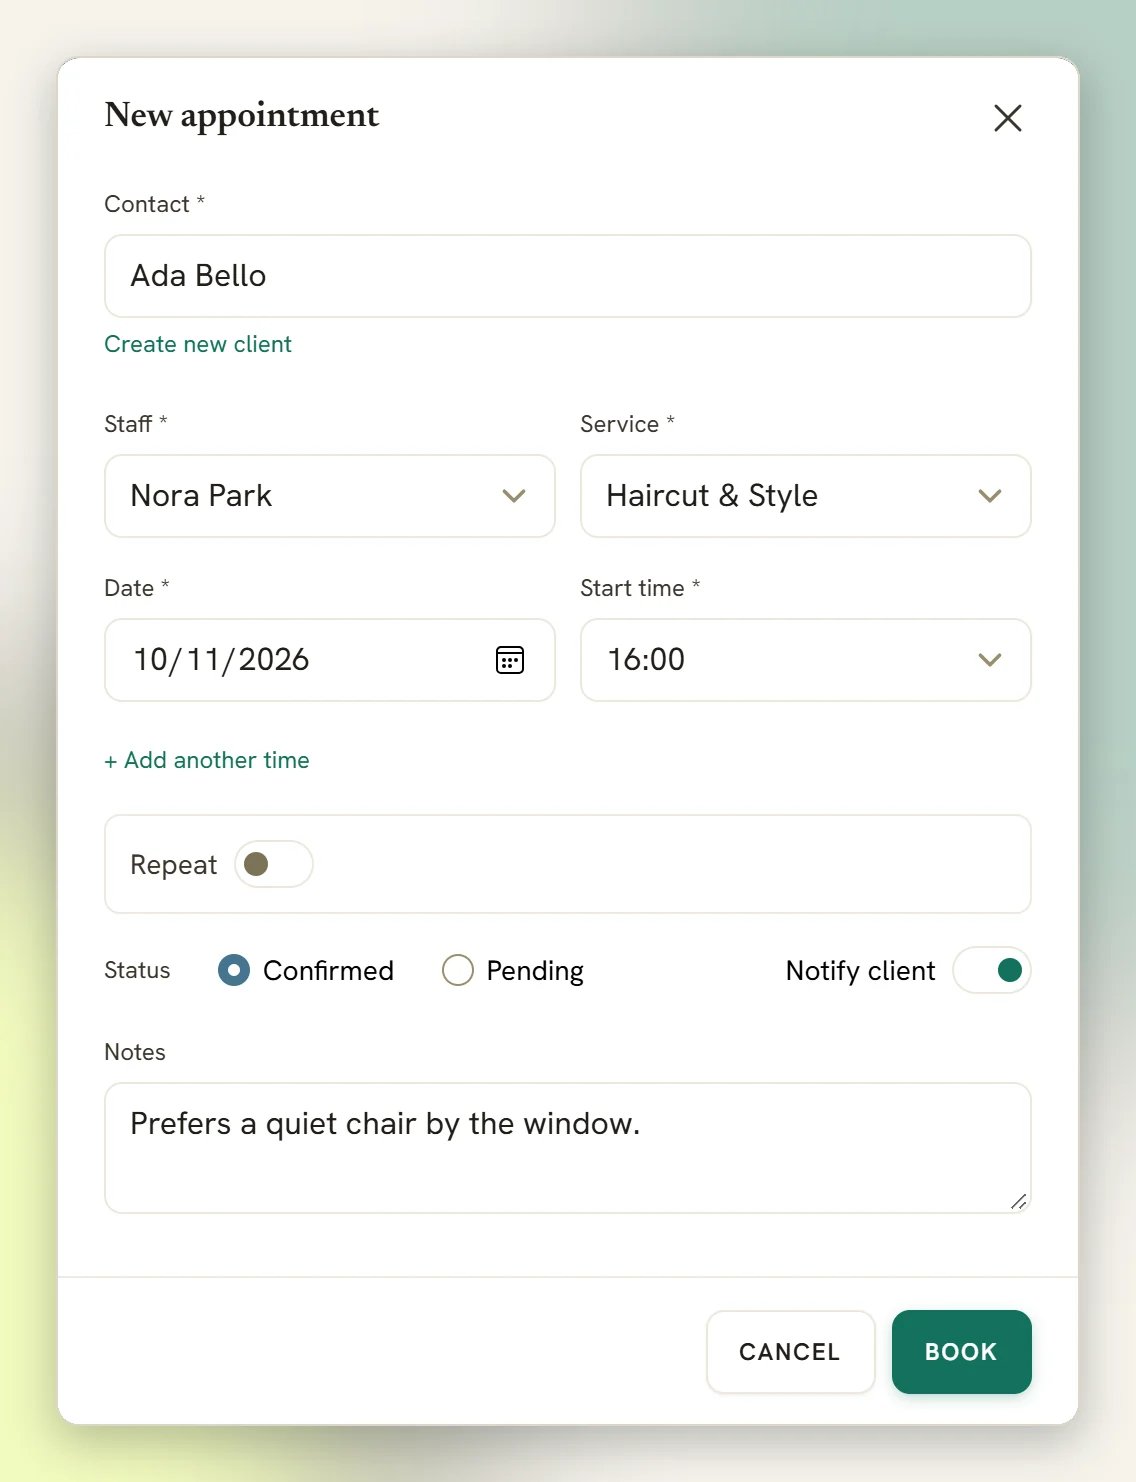
- Search and select a client finds existing contacts by name, email or phone as you type.
- If they’re new, select Create new client. The search swaps to three inline fields (Name, Email, Phone), so you create the contact and the booking in one go without leaving for the Contacts page. (← Search existing takes you back if you change your mind.) The contact this creates is a real CRM record, marked as arriving via an appointment.
On a Pay before booking service, a booking you add by hand takes payment like the booking page does: the slot is held and the client is messaged a payment link (for the deposit, if the service takes one), and the booking confirms once they pay. The hold lasts two hours. Taking the money yourself? Tick Payment taken in person and it confirms straight away with no link. The box only appears for a single confirmed booking; several slots at once, or a repeating series, confirm without payment. See Take payment for a booking.
Book a recurring series
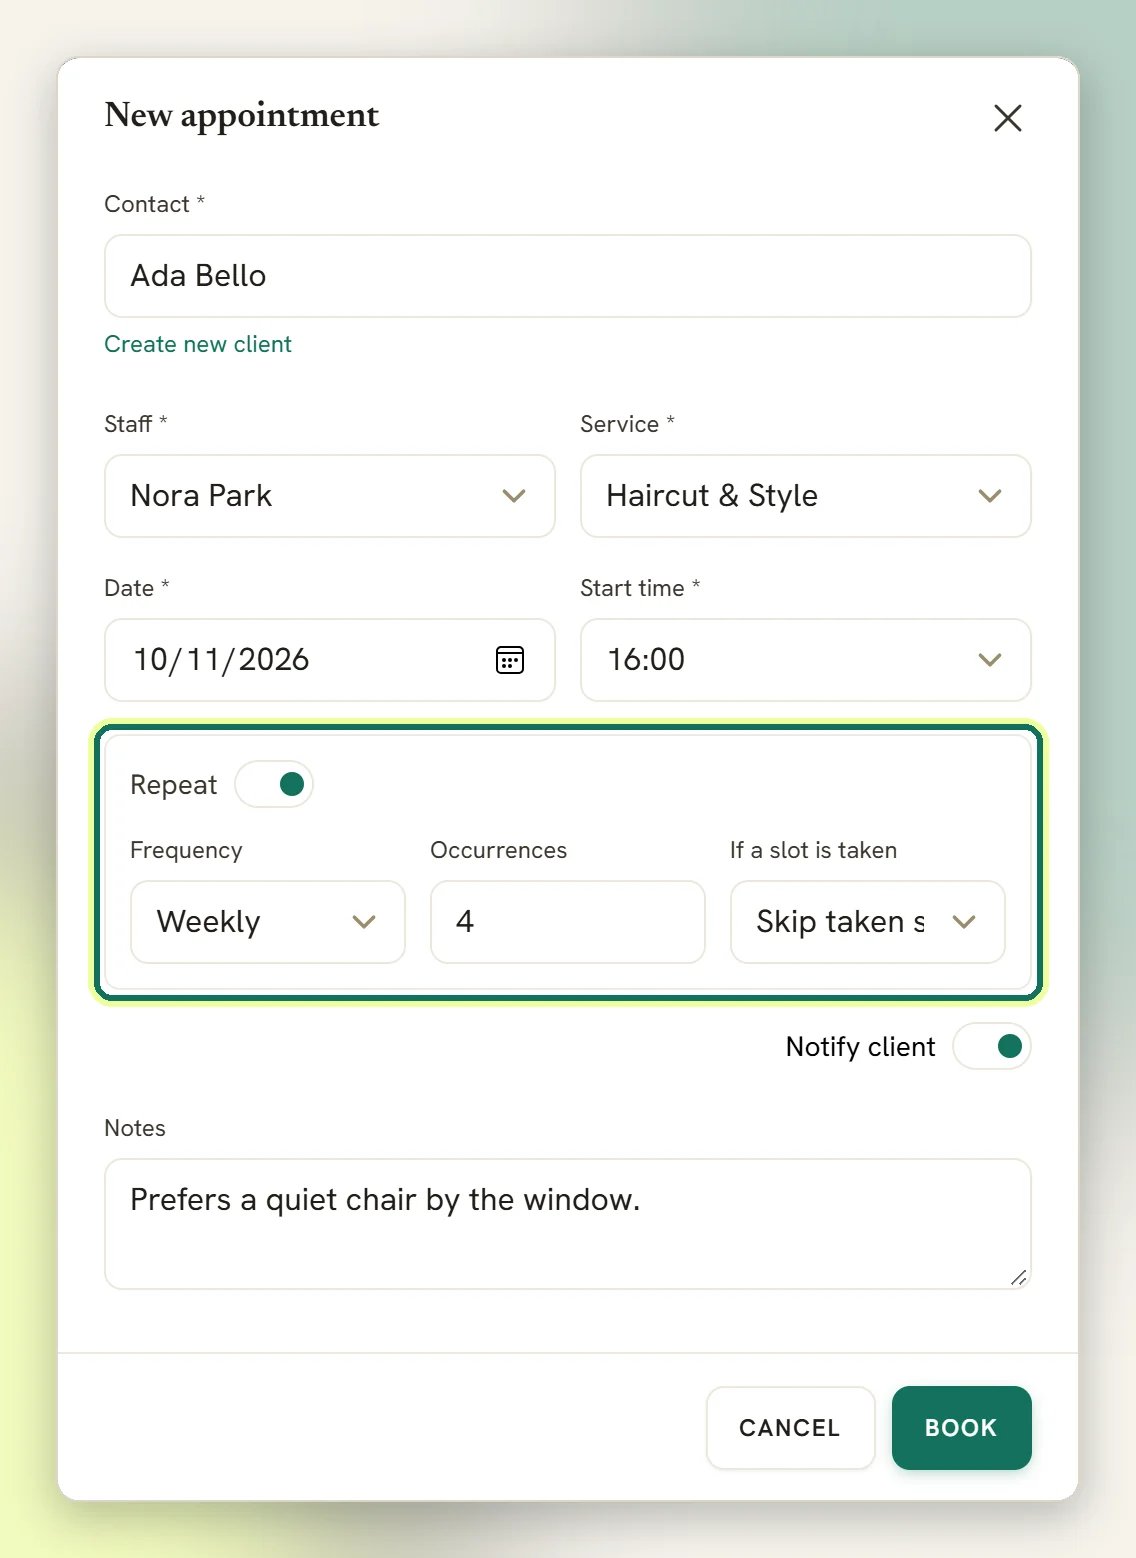
For a client who comes back on a schedule (weekly physio, a standing consultation), book every date in one go instead of one appointment at a time. From the Calendar view, open New appointment and turn on Repeat. Repeat is hidden while you’re using + Add another time to book several one-off dates for the same client, and vice versa. The two are separate ways to book more than one slot at once. With Repeat on, three fields appear:- Frequency: Daily, Weekly, Every 2 weeks or Monthly.
- Occurrences: how many appointments to create, from 2 up to 52.
- If a slot is taken: Skip taken slots (the default) books every date that’s free and quietly skips the ones that aren’t, or Require all slots free, which books nothing at all if even one date in the series is already taken.
- The appointment-booked automation fires once for the whole series, not once per date.
- The calendar and Zoom events are pushed in the background.
- The client gets one consolidated confirmation instead of one per date.
A recurring series is booked by staff from the Calendar; a client can’t start one themselves from the booking page, only book single appointments there. And a series never takes payment, whatever the service’s payment mode; see the note above.
Cancelling or rescheduling one date vs. the whole series
Reschedule always moves a single date, for you and for the client. Nothing shifts every remaining occurrence at once. To move the whole series, cancel what’s left and book a fresh one. Cancelling is where the choice lives, and it defaults to the wider option:- From the Calendar. Opening a recurring booking’s detail panel shows a ↻ Recurring badge and two destructive buttons: Cancel meeting, which cancels only that date, and Cancel series, which cancels that date and every later one in the series.
- From the client’s own booking-management link. Cancelling a recurring booking shows a checkbox, Cancel all upcoming in this series, checked by default. Left checked, it cancels this date and every later one; unchecked, it cancels only this one.
Appointment notes
A booking can carry internal notes: staff-only text that the client never sees. There are three ways they get written, and one place you read and edit them:- On the Calendar. Open a booking in the Calendar view and its details panel has a Notes section: select Add note (or Edit note) to write or change it right there. The New appointment form takes a note too, so you can jot one as you book.
- A flow can write them. The Add Appointment Note step (in the flow builder’s Appointments group) appends a line to the booking’s notes; its own hint says “Internal note — never sent to the contact.” Point it at
{{appointment.id}}in an appointment-triggered flow to record, say, the answer a client gave to a pre-visit question. - The API can read and write them. Create a booking with notes, or read them back from the appointment endpoints.
The Calendar editor replaces the whole note; the flow step appends to it. So a flow can keep adding lines automatically, and you can still open the booking and rewrite the lot by hand. The Bookings list doesn’t show the text; it just marks rows that have a note with a small icon, so sensitive detail stays on the booking itself.
What happens after the booking
Once a booking is confirmed, DMLY does the rest on its own:- Confirmation and reminders. Reminders are seeded from the service’s reminder times (for example, a day before and an hour before) and go out on the client’s channel. A reminder is skipped, not retried, if the booking is no longer confirmed, or the contact has opted out or has the bot paused. The meeting time is fixed, so a missed window can’t be caught up later.
- Your team is told too. The assigned staff member gets their own message, and the rest of the active team gets a heads-up. Reminders never notify the team.
- The calendar event. The event is pushed after the booking is saved, so a Google or Zoom failure can never lose you the slot. If nothing is connected, the booking simply lives in DMLY.
- Automations fire. Appointment booked, cancelled, rescheduled, completed and no-show all work as triggers, and so does Appointment confirmed. Classes fire their own class events instead. See Triggers. Two of those triggers are narrower than they sound:
- Appointment confirmed fires only when a Pay before booking hold clears its payment. That happens when the gateway confirms it, when the payment is recorded against it in DMLY (by you, or by a flow’s Record Payment step), or when a flow’s Confirm Appointment step confirms it. It fires on top of Appointment booked rather than instead of it, so a flow on each runs both on a paid booking. An ordinary or pay-after booking fires Appointment booked alone.
- Appointment completed fires when the booking is marked completed by you on the Calendar, by a flow, or through the API. It also fires when DMLY closes a past booking for you, unless you’ve told it to wait for your review.
Past bookings close themselves
About a day after an appointment’s time has passed, DMLY closes off any booking still sitting at Confirmed or Pending. What it closes it as is your choice, under Appointments → Settings → Booking policy → Appointments nobody marked:- Count as completed (the default): the booking becomes Completed, and everything a completion sets off happens. The Appointment completed trigger fires, the
appointment.completedwebhook is sent and loyalty points are awarded, even if the client didn’t come. - Wait for review: the booking becomes Needs review and nothing is sent. Mark it completed or no-show yourself, and the matching messages, points and fees follow then. While any are waiting, your team gets one in-app notification a day that opens the Bookings list filtered to them, and each booking’s menu there lets you settle it. Class seats are settled from the class roster.
- The client’s manage link goes read-only. It keeps working and still shows the booking’s details, but cancel, reschedule and the Add to calendar links all disappear, replaced by This meeting has passed.
- You have about a day to record a no-show. On the Calendar, a 1:1 appointment’s Completed, No-show, Reschedule and Cancel meeting buttons disappear from its detail panel once the booking is retired. Class rosters are the exception: you can still mark Attended or No-show there afterwards. With Wait for review, a booking in Needs review can be settled whenever you get to it.
A reschedule is refused even before the sweep runs: once an appointment’s time has passed, the client’s manage link answers Could not reschedule. Please try again. rather than moving it.
When you charge
Each service has a Payment mode:- No payment required.
- Pay after the appointment: the booking is confirmed first, then the pay link goes out.
- Pay before booking: the slot is held for 15 minutes while the client pays.
Appointments vs the Meetings hub
They are not two systems. Meetings came first; Appointments is the same thing grown up. A meeting type is a service now, and a booking made either way is the same record, so everything shows up in the Appointments calendar, in reports and in the client’s profile regardless of where it started. Use Appointments for new work. It is the one that has staff, per-staff hours, classes and waitlists, payment modes, the branded booking page and calendar sync. Existing meeting types keep taking bookings; you don’t have to migrate anything to keep the lights on. Add staff when you need more than one bookable person or per-person hours. The one thing worth knowing about the older setup: if a service has no staff member with working hours of their own, DMLY falls back to the weekly hours and timezone stored on the service itself, the single-host way. You edit those in Offerings → Services: open the service and use Weekly availability and Timezone. The same fields are on the Meetings → Meeting types editor. See Meetings for the older hub.Appointment reports
The booking numbers are not in the Appointments hub. They are a tab of the Reports section, at Configurations → Reports → Appointments. The page itself is headed Appointment reports, Bookings, attendance and revenue across your services and staff. Five cards run across the top: Total bookings, Completed, No-show rate, Revenue (paid) and Avg class fill. Completed counts every booking in the completed status, which includes the past bookings DMLY retired automatically as well as the ones you marked yourself. Below them, By service and By staff break the same bookings down row by row (bookings, completed, no-shows, and revenue on the service table). Narrow all of it with From, To, Staff, Service and Status; the cards and both tables follow the filter. CSV downloads one row per booking (date, service, staff, client, status, source, price, paid). PDF downloads the By service and By staff breakdowns as a formatted report. Either one needs the Export reports permission. See Exporting reports.A teammate without View team appointments only ever reports on their own bookings: the staff filter is forced to their own staff record, and a teammate with no linked staff record gets an empty report rather than the workspace’s figures. See Roles and permissions.
Before you start
1
Connect a channel
Reminders and confirmations go out over a channel. Connect WhatsApp first. See Connect WhatsApp.
2
Create your services
Go to Offerings → Services and add what you take bookings for, with the duration, price and reminder times. See Services.
3
Add staff and their hours
Add each bookable person, tick Accepts bookings, set their Working hours, and assign the services they offer. See Staff and availability.
4
Connect a gateway if you charge
Do this before switching any service to Pay before booking, or nobody can book it. See Payments.
5
Share your booking page
Preview it, brand it, then send the link on WhatsApp. See Booking page.
Things people expect to find and don't
Things people expect to find and don't
A dashboard inside the Appointments hub. The hub has no summary view of its own. The dashboard exists, but it lives in the Reports section instead: see Appointment reports above. (Bookings does count: each tab’s label carries the number of bookings in it.)A way to edit a whole class series from the dashboard. A class can now be created as a repeating series, and you can cancel one session or that session and every later one. What there is no screen for is editing a series after the fact: changing capacity, location or the host across later occurrences is an API call, not a button. See Classes.A way to reschedule a whole recurring series at once. Reschedule always moves one date, whether you or the client does it. To shift everything left in a series, cancel the series and book a fresh one.A staff member who can log in. A staff member is a bookable person, not a user. Linking them to a team account is optional: use Link team member if they should manage their own bookings.