

In the browser, branding only applies on your own domain. On the DMLY app host your
clients see DMLY’s own name, logo and colours. Connect a custom domain first. See
Custom domain. The DMLY mobile app is different: once a client signs
in, it shows your app name and your accent colour, because it follows the workspace’s agency.While your agency is suspended, your domain still shows your app name and colours, sign-in
page included. Custom scripts stop and your sub-accounts are locked. The mobile app falls back
to DMLY’s branding.
Set your brand
1
Open the reseller dashboard
Select Reseller Dashboard from your user menu, then go to Settings.
2
Fill in the Brand section
Set Agency name, App name (shown to customers), Logo URL, Dark-mode logo
URL, Favicon URL, Powered by link, Help centre link and Primary color.App name (shown to customers) is what replaces “DMLY” throughout the product: the
browser tab title and the app name your clients read. Agency name is how your agency
is identified internally; it is only used as a fallback if App name is blank.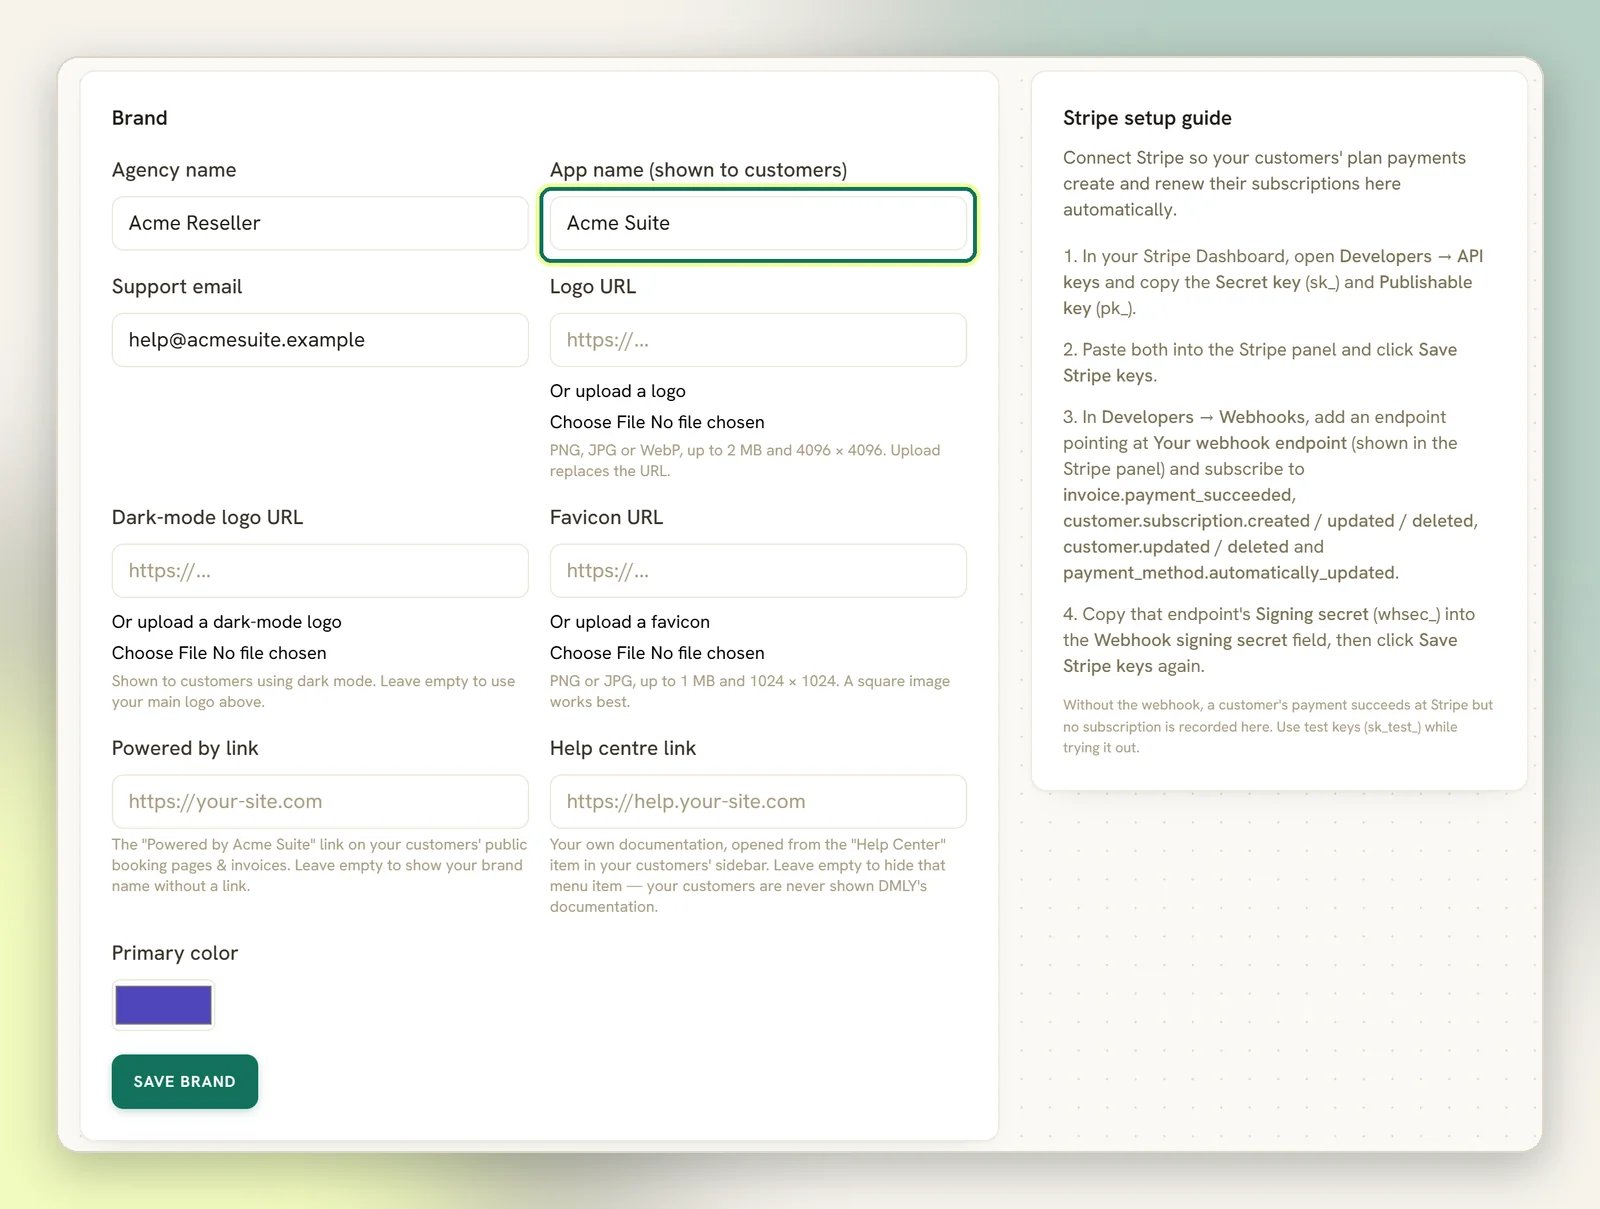
3
Save
Select Save brand. You see Settings saved. and the change applies on your next
page load on your branded domain.
Logo
Logo URL takes a link to an image you host, or select Or upload a logo to upload one (PNG, JPG or WebP, up to 2 MB and 4096 × 4096). An upload replaces the URL. It replaces the DMLY logo for your clients. If you leave it blank, your clients see the DMLY logo. Dark-mode logo URL sets a separate logo for clients using dark mode, and can be uploaded the same way. Leave it blank and your main logo is used in dark mode too.Favicon
Favicon URL sets the small icon in the browser tab, or select Or upload a favicon (PNG or JPG, up to 1 MB and 1024 × 1024; a square image works best). Your clients see it in the dashboard’s browser tab on your branded domain and in the Live Chat widget.Colour
Primary color is a single colour. There is no full palette editor; you pick one colour and DMLY applies it to buttons, links and accents across the app. The lighter tints and darker shades the app needs, such as tinted backgrounds and focus outlines, are worked out from that one colour. The colour is saved as a six-digit hex code like#4f46bb, which is what the picker always
gives you. Anything else is refused with Colours must be 6-digit hex codes, like #4f46bb.
under the field.
Help centre link
Help centre link takes a link to your own documentation. It becomes the Help Center item at the foot of your clients’ sidebar, and opens in a new tab. It saves with the rest of the Brand section under Save brand, not with a button of its own. Leave it blank and that menu item does not appear for your clients at all; they are never sent to DMLY’s documentation. Your own workspace is the exception on the DMLY app host. You are a DMLY customer underneath your agency, so there you keep DMLY’s docs whatever you set here. On your own domain the item is hidden for your workspace. The value must be a fullhttp:// or https:// address, up to 2,048 characters. Typing
help.acme.com without the scheme is rejected with a validation error under the field.
The two labels are spelled differently. The field you fill in is Help centre link; the
menu item your client clicks is Help Center.
What Powered by renders
Powered by appears on your public booking pages, on the HTML version of an invoice, in notification emails, and in the footer of the Live Chat widget your clients embed on their own sites. It reads as your brand, not DMLY’s:- The label is your App name (shown to customers). If that’s blank, it falls back to your Agency name.
- It links to your Powered by link. If you leave that blank, it links to your custom domain instead. If you have neither, the label renders as plain text with no link.
There is no switch to remove Powered by. It always renders in those places; the most
you can do is make it point at you. It is omitted from the invoice PDF.
What you cannot change
The mobile app icon
The DMLY mobile app keeps DMLY’s own icon. Your favicon only changes the browser tab and the
Live Chat widget.
Removing Powered by
It renders on booking pages, HTML invoices, notification emails and the Live Chat widget
footer, with no toggle.
More than one accent colour
One Primary color, no palette editor.
Sending email as yourself
Branding your app name doesn’t change who your clients’ emails come from. To send from your own domain, fill in the Email (SMTP) section on the same Settings page and select Save SMTP. As the confirmation says: set SPF/DKIM for your domain so those emails land in inboxes.Adding your own scripts
The Custom scripts section on Settings adds your own code (analytics, pixels, a chat widget) to pages on your domain. Paste it into Scripts inside the<head> tag or
Scripts before the </body> tag, then select Save scripts.
Only the agency owner can see or change this section. Team members see Only the agency owner
can view or change custom scripts. Ask them if you need analytics, a chat widget or a pixel
added. in its place, whatever their role. No role you build on Team can grant it: the
Edit sign-up page and customer workspace options permission covers the
Customer signup & workspaces panel, not scripts.
That permission used to be called Edit signup and custom scripts, and it let team
members save scripts. If you ever gave it to anyone, open Custom scripts and check that
everything there is code you put there or recognise.
Where your scripts run
Your scripts are added in two places, both on your domain:- Your public sign-up page, for visitors who aren’t signed in. It’s the only page a signed-out visitor gets them on.
- Your customers’ dashboard pages, such as the inbox, the members page and their billing page, when a customer of your agency is signed in.
- Your Reseller Dashboard, and the page a new team member opens from their invitation.
- Sign-in, password, two-factor and email verification pages.
- A customer’s profile and security pages, their workspace Settings page (where they create API keys) and Workspace Services page (where their own service credentials are saved), the integration pages where they manage API keys and other credentials, and the pages where they connect WhatsApp.
- You, and anyone on your team or on another agency’s team.
- DMLY staff.
- Anyone inside a client workspace through Open, including you.
- A customer who also belongs to a workspace outside your agency.
Next
Custom domain
Branding needs your own domain. Connect one and verify its DNS.
Client workspaces
Assign plans, suspend or open a client’s workspace.
Plans and billing
Bill your clients through your own Stripe account.
Agency overview
How the reseller layer fits together.